
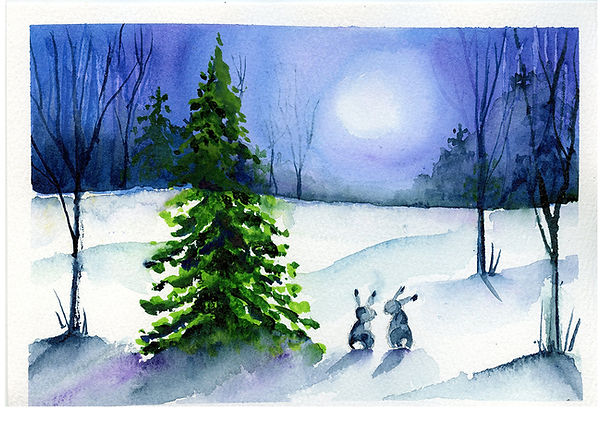
Moonlit winter landscape in Watercolour
Below are simple, beginner-friendly steps you can follow at home to recreate the moonlit winter scene with the two rabbits. No pressure — keep it loose, enjoy the process, and remember the magic is in the soft edges and atmosphere.

Materials
-
Watercolour paper (A5), 300lb, Not pressed
-
Brushes: medium round, rigger (liner) brush
-
Paints: Prussian Blue, Indigo, Violet, Sap Green, Hooker’s Green or Earth Green, White gouache (or white acrylic) for snow splatter
-
Watercolour pencil or draw very lightly with a graphite pencil
-
Water pot, kitchen roll, palette, scrap paper
Quick colour mixes to have ready
-
Soft Night Blue: Prussian Blue and Violet
-
Background Trees & bushes - Indio, violet and a touch of earth green
-
Foreground Tree Green: Sap Green, Earth/Hooker’s Green + a little Indigo (for depth)
-
Warm Shadow for Snow: tiny prussian blue & violet + water (very diluted)
-
Rabbit Grey: Indigo, prussian blue, sap green

1. Light sketch (5 min)
-
Lightly draw: horizon line and a circle for the moon (larger than you need). Keep lines faint.
-
Two rabbits - like this
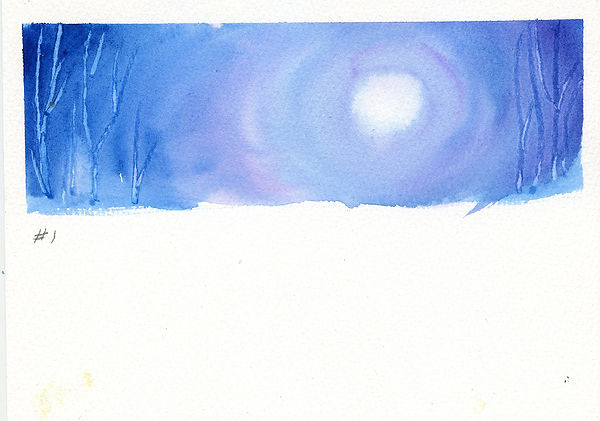
2. Sky & moon — (15 mins)
-
Wet the moon and a 1 cm around it evenly with clean water. Swoosh very diluted violet in a circular motion around the outside of the moon. Don’t paint the moon (lift gently with a tissue if needed). Nice and loose, no hard lines. Now pick up some watery prussian blue and swoosh this outside the violet - max 5cm diameter. Let it blur and breathe — we’re looking for a dreamy feel.
-
Add water to the left hand side of the painted area to blur it out. No hard lines needed here.
-
Turn your attention to the right hand side of the sky. Add a creamy mix of violet to the far right hand side and and blend it towards the moon area. Drop in a bit of Prussian blue.
-
Do the same on the right hand side, but start with a creamy mix of prussian blue that gets lighter as it approaches the moon. Drop in some violet swooshes.
-
Don’t overwork — stop when it still feels fresh.
-
Let it dry completely
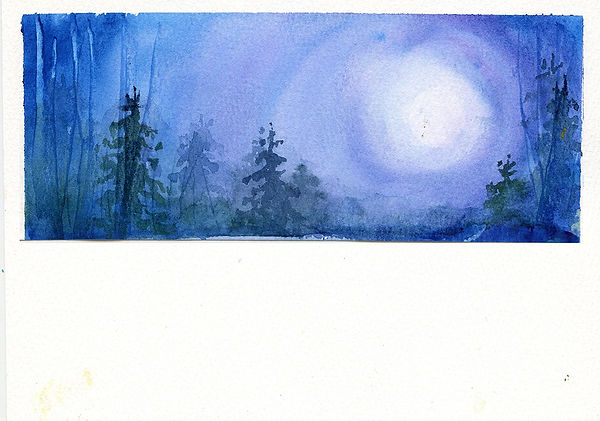
3. Distant tree line(5–10 mins)
-
Add some creamy indigo paint at the bottom of the tree line. More towards the left and right hand side and less in the middle. Add a dot of deep green here and there for interest. Using a damp brush coax the paint further up into the sky. Remember that paint will naturally travel into water, so you don’t need to pull the paint up the page. Instead dampen the area just above this creamy paint (about 3-4 cm high), then use your brush to push the water down into the paint. The paint will flow into it.
-
With a soft, damp brush and a very dilute blue/violet mixes, tap in the suggestion of faraway trees. Keep them soft and low contrast so they sit back in the scene.
-
Optional - use a plastic card to scratch out some white tree trunks and branches
-
Let it dry
4. Foreground trees — wet-on-dry (15–20 mins)
-
Main fir tree
-
Notice that this tree has a light, moonlit side and a dark side
-
Use sap green to map out the shape of the tree - doesn’t have to be perfect or completely full.
-
Use earth/hookers green to darken the underside of the tree branches. Remember the centre of the tree will have more darks and the edges will have more gaps.
-
Stick Trees
-
Use a liner brush to place these in a loose way. Lighter colours for the distant one and sharper, darker colours for the ones in the foreground.
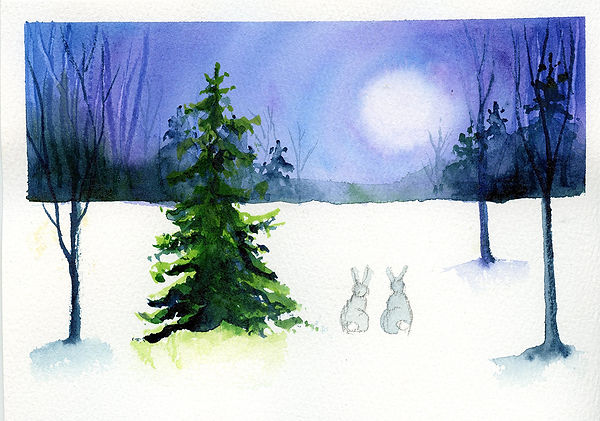
5. Paint the rabbits — simple silhouettes (10 mins)
-
Base wash: Using your Rabbit Grey (very diluted indigo + violet + sap green), paint two upright ovals for bodies and small circles/ovals for heads. Keep shapes soft and keep the tails unpainted.
-
Ears: Add two long tapered ear shapes for each rabbit. Keep light
-
Second layer (once dry): When dry, add a darker tone to one side of each rabbit to give a sense of roundness. Keep faces as tiny marks or leave them as silhouettes — moonlight keeps detail minimal.
-
Add a shadow under each rabbit using violet and prussian blue. Fade this out into the snow
6. Shadows (10 mins)
-
Add a shadow under each rabbit using violet and prussian blue. Fade this out into the snow
-
Add foreground tree shadows to anchor the composition. Add small grasses or twiggy marks near tree bases.
-
Add some light swoops of colour to suggest snow drifts.
-
Add some very dilute colour under the distant tree line and been out randomly

7. Snow splatter (5–10 mins)
-
Use thick white gouache to add snow to the right hand branches of your main fir tree.
-
Now mix a little indigo into the gouache and use this to add shadow snow to the left hand branches. Add white to the stick trees - moonlit side
-
Mix the white gouache with a little more water (test on scrap). Hold your brush and flick the bristles with a finger to create a range of snow sizes — closer, larger splatters; in the distance, smaller specks. Practice first on spare paper.
I would love to see how you do, tag me on instagram or facebook @kerryslackart
Book Your Spot

Starts Jul 4
From 20 British poundsLoading availability...
Loading availability...

Starts Jul 18
From 20 British poundsLoading availability...
Loading availability...

Started Jun 20
125 British poundsLoading availability...
Loading availability...

Started Jun 2
From 115 British poundsLoading availability...
Loading availability...

Started Jun 17
From 125 British poundsLoading availability...
Loading availability...