
How to paint spring rabbits
... soft and loose
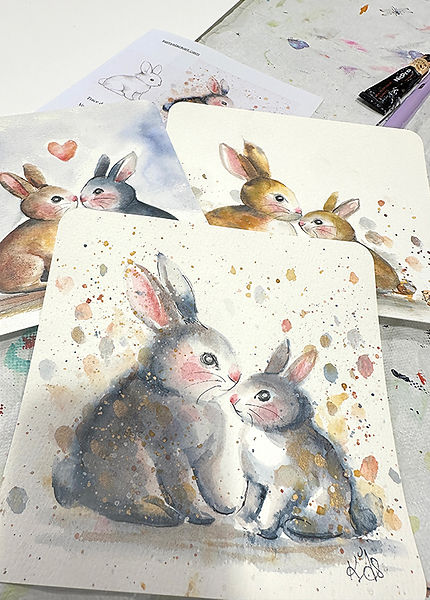
Aim of the session
Two simple bunny shapes painted with soft washes and playful splatter.
The aim is to keep the painting light, loose and full of character. Less is more.
Materials
-
Watercolour paper, 300gsm cold pressed, A4
-
Tube watercolours
-
Brushes (medium round + small detail brush)
-
Black fine liner or black biro
-
White gouache (optional)
-
Tissue / kitchen roll
-
Water pot
-
Watercolour Pencils and sandpaper for texture (optional)
Colours: Paynes Grey, neutral tint (or white) and pink (or cad red) - grey bunny
Yellow ochre, burnt sienna, ultramarine blue, pink (or cad red), white - warm brown bunny
Gold / silver watercolour paint optional
Handy Hints
Paint this in layers, the first layer does not have to be perfect, we are just laying down colour zones and can enhance later


1. Sketch or trace lightly
-
Use a soft pencil and keep your drawing minimal.
-
Avoid adding detail — the paint will do the work.

2. First Colour Wash
Remember to allow the colours to blend naturally.
Think of the body in three tones, white, light grey, dark grey. The white will be the white of the paper, so avoid getting any paint in those areas. See the hatched illustration above, which shows where the darkest darks go.
Wet the whole of the body shape. You should see a sheen on the paper but the water must not be rolling around.
Paint a fairly concentrated amount of paynes grey along the back of the body and let it diffuse across the paper. If the paint is not moving, with a slightly damp brush, tap a little water into the leading edge until the paint starts to move. You'll now move on to repeat this process with the ears, head and tail legs etc. Keep any eye on the body.
While the paint is still slightly damp, add deeper tones to create softness and depth.
Focus on:
-
edges of the body
-
base of the ears
-
under the chin
-
far legs
Allow colours to blend and bloom naturally.
DRY completely

2. Second colour wash
Once dry, add a hint of pink on the cheeks and ears and nose. You can also drop this colour sparingly into other areas of the body.
Look again at your shaded areas, are they dark enough? Do you need to darken a leg, or under the belly? Darks next to white areas will help them stand out.

3. Paint the Features
Once dry, add the small details with pencil and fine liner that bring the bunnies to life.
Paint:
-
small black eyes - mark the eye area and highlight first with pencil, then use fineliner within this area - leave some pencil showing so that the eye blends in
-
add delicate whiskers
-
the odd sketchy line to subtly redefine a lost shape
Keep the details minimal.
Use a dry brush in a dark colour to create the ground. Remember to connect it to the rabbit's paws, so the poor creatures are not left in mid air. Use a damp brush to soften the dry brush out here and there.

4. Add Splatter
Cover your rabbit's faces and white areas with tissue
Load your brush with diluted paint and gently tap to create loose splashes around and over the rabbits. You can widen some of these with a brush
Use warm colours and optional gold to add energy and texture. I like to mix my colours with white to make them opaque
Add pencil shavings to damp sports to enhance fur texture
Tip
Keep it loose and playful.
Hinting at detail in a minimal way creates the most charm.
"The magic of watercolour is letting the paint move. Don’t try to control everything.”
If you give this a go, I'd love to see it. Please tag me on instagram @kerryslackart


Starts May 5
25 British poundsLoading availability...
Loading availability...

Starts May 9
From 20 British poundsLoading availability...
Loading availability...

Starts May 9
From 20 British poundsLoading availability...
Loading availability...

Starts May 13
From 20 British poundsLoading availability...
Loading availability...

Starts May 16
From 20 British poundsLoading availability...
Loading availability...

Starts May 23
From 20 British poundsLoading availability...
Loading availability...

Starts May 30
From 20 British poundsLoading availability...
Loading availability...

Started Apr 14
From 83.34 British poundsLoading availability...
Loading availability...

Started Apr 18
From 115 British poundsLoading availability...
Loading availability...

Started Apr 29
125 British poundsLoading availability...
Loading availability...

Starts Jun 20
From 115 British poundsLoading availability...
Loading availability...

Ended
105 British pounds
Ended
From 110 British pounds