
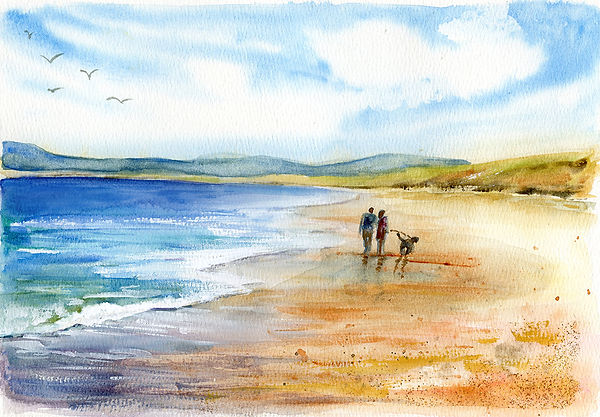
How to paint a loose watercolour beach scene

In this step-by-step watercolour tutorial you’ll learn how to paint a calm coastal landscape using loose, expressive techniques. This beach scene focuses on building a soft sky, painting distant hills, creating gentle sea movement with horizontal washes, and capturing the reflective look of wet sand along the shoreline.
Perfect for beginners and improvers, this painting introduces simple ways to suggest depth, atmosphere and light while keeping your brushwork fresh and relaxed. By the end of the tutorial you’ll have a finished seaside painting and greater confidence painting water, skies and sandy textures in watercolour.
Materials
-
Watercolour paper, 300gsm cold pressed
-
Suggested tube watercolours - prussian blue, cerulean blue, pink or alizarin crimson, yellow ochre, pthalo green, burnt umber, white gouache and (raw sienna optional)
-
Brushes (large flat or round wash, medium round + liner brush)
-
White gouache
-
Tissue / kitchen roll
-
Water pot
-
Watercolour Pencils and sandpaper (Optional)
Step 1 – Light Pencil Sketch (5 minutes)
Keep the drawing very simple.
-
Draw the horizon line about one third down the page.
-
Sketch the headland hills in the distance with soft curves.
-
Draw the curving shoreline sweeping into the foreground.
-
Lightly mark two small figures and a dog near the water’s edge.
“Keep the figures tiny
A curved shoreline:
leads the viewer’s eye into the painting
naturally guides attention towards the figures
creates depth and movement
A straight line often makes the scene look flat.

Step 2 – Paint the Sky (Wet-into-Wet)
-
Wet the sky area with clean water.
-
Drop in Cerulean Blue loosely across the top.
-
Leave white paper for soft cloud shapes.
-
Let the paint diffuse naturally.
-
Going back to touch up the sky never ends well :)
Let dry.

Step 3 – Distant Hills
Things in foreground are bright, have detail - those further away, recede. They are smaller, flatter, lack detail, blur into each other, have desaturated colours
Using a very diluted mix of cerulean blue, yellow ochre + a touch of pink/red:
Paint the distant green hills in one soft wash.
Keep the colour pale to show distance, you can swipe out some highlights with a thirsty brush and drop some sienna and burnt umber in to create a little interest.
Allow to dry
Using a mix of prussian blue and yellow ochre, paint the blue hills, using the same method

Step 4 – Sea
Use prussian blue, Cerulean +pthalo green
-
Paint the sea area with dry brush horizontal strokes - to suggest waves
-
Leave white and lighter bands for foam and reflections.
-
Add slightly darker blue on the horizon
-
As you move down the page, introduce cerulean blue and a turquoise mix (cerulean + pthalo green)
-
You'll likely end up with more white areas than you need. You can blend these out with a damp brush
Use the brush lightly to suggest wave movement.
Dry brush technique - You'll need to load up your brush with fairly concentrated paint and swish your brush lightly across the texture of the paper (horizontally) to get the skippy dry brush effect. As though you were using a feather. Less is more, you can always add more later. If the effect seems too much in areas, just a slightly damp brush to soften out some of the texture / tissue to pick some paint up


Using a liner or rigger brush, create some horizontal ripples in the water. Pay attention to the surrounding colours and try and harmonise with them. Vary the pressure on your brush to achieve a ripple effect. One of two ripple s-curves add interest too.

Step 5 – Beach Wash
Start at the top right of the sand and lay down a very diluted wash of yellow ochre. As you move down the page, drop in touches of burnt sienna.
-
Extend the water slightly up the beach where the reflections are
The paper should be damp but not puddling.
Let the colours blend loosely to create natural sand textures.
While still damp you can flick a little paint for speckled sand texture.
Damp sand
Mix a very diluted wash of:
-
Yellow ochre and cerulean blue
Lightly brush this across the damp area.
This creates that cool sandy tone you see in wet sand.
Keep the colour very pale.
Reflections in the wet sand
Softly wet the reflection area. Drop soft yellow ochre, cerulean blue and possibly a desaturated purple mix here and there (desaturated purple = cerulean blue, pink & a little yellow ochre).
Let things blend naturally, don't force it. Keep light. You are aiming to have a loose reflection of clouds and sky here with sand showing through here and there.
This gives the illusion of water sheen.
If the reflections look too strong:
-
take a clean damp brush
-
gently drag across them horizontally
“Think of the wet sand like a mirror that has been slightly smudged. You want a hint of reflection, not a sharp copy.”

Step 6 – Water’s Edge
“Imagine the tide coming in and out — the water almost never forms a perfectly straight edge.”
With a medium brush:
-
Use white gouache or bleed proof white and an old brush to create the breaking wave on the shoreline - Remember the wave will be smaller in the distance.
-
Use a dry brush technique and the tip of the brush to pull some white paint back into the sea - to suggest foam. DRY completely
-
Add a soft grey-blue line where the white wave meets the sand and immediately soften with a damp brush to suggest the shadow under the breaking wave
-
Pull a few strokes horizontally for ripples of water
-
Add some white marks to suggest water ripples on the sand
Keep these marks are loose.
7. Add Texture to Dry Sand
Once dry, flick a few tiny speckles using:
-
Burnt Sienna
-
Raw Sienna
Focus these on the drier sand areas, not the reflective part and in the foreground.
Wet small patches of the foreground sand and dust watercolour pencil to create a fine sandy texture (sandpaper)


8. Figures and Dog
Keep them tiny and minimal, about a two thirds of the way across the page, not in the middle.
Using very light Payne’s Grey and a small brush:
Paint very simple shapes:
-
small dot for head
-
short rectangle for torso and two quick legs, one shorter than the other to look like they are walking
-
Drop in other colours to suggest clothes etc
-
Add a quick shape for the dog.
Add short horizontal dashes under the figures.
Then soften with a damp brush.
This suggests wet sand reflection.
9. Final Details
Look at your painting. What else does it need to fill it out?
Birds?
Does it need some more contrast in water?
further lines & ripples?
splashes?
watercolour pencil shavings?
more shadows under the waves
Some light spots lifted out?
Stand back periodically, to asses your painting, maybe it is finished? Less is more in watercolour
"The magic of watercolour is letting the paint move. Don’t try to control everything.”
If you give this a go, I'd love to see it. Please tag me on instagram @kerryslackart


Starts Apr 29
25 British poundsLoading availability...
Loading availability...

Starts May 5
25 British poundsLoading availability...
Loading availability...

Starts May 9
From 20 British poundsLoading availability...
Loading availability...

Starts May 9
From 20 British poundsLoading availability...
Loading availability...

Starts May 13
From 20 British poundsLoading availability...
Loading availability...

Starts May 16
From 20 British poundsLoading availability...
Loading availability...

Starts May 23
From 20 British poundsLoading availability...
Loading availability...

Starts May 30
From 20 British poundsLoading availability...
Loading availability...

Started Apr 14
From 83.34 British poundsLoading availability...
Loading availability...

Started Apr 18
From 115 British poundsLoading availability...
Loading availability...

Starts Apr 29
125 British poundsLoading availability...
Loading availability...

Starts Jun 20
From 115 British poundsLoading availability...
Loading availability...

Ended
105 British pounds
Ended
From 110 British pounds